Cadet Tech : Digital Storytelling
Showing posts with label Digital Storytelling. Show all posts

Monday, April 10, 2017

Don't Flip Out: Increase Information Literacy in the Unflipped Classroom with Video Tools EdPuzzle and Updated PlayPosit

1:23 PM 1
Don't Flip Out: Increase Information Literacy in the Unflipped Classroom with Video Tools EdPuzzle and Updated PlayPosit
Don’t Flip Out: Increase Information Literacy in the Unflipped Classroom with Video Tools EdPuzzle and the Updated PlayPosit

As the flowers are in bloom and spring break is nearly upon us, you may be tempted to fire up your youtube bank of Crash Course or Bill Nye. Let’s review a couple tools that may have fallen by the wayside for you. These sites can increase engagement for students as they watch with customized checks for understandings, quizzes and reflections.

EdPuzzle and PlayPosit allow you to clip, crop, record narration and add quiz questions right in to videos from most sources. Perhaps part way through this classic clip of Jim Harbaugh’s visit to Bayside High on Saved By The Bell, you may want to ask a question to support your inquiry, or point something out to students. With EdPuzzle and the new PlayPosit, students are forced to answer your questions individually and stay engaged through the video.

PlayPosit                                        EdPuzzle 


PlayPosit  (formerly EduCanon)

**If you have been using PlayPosit, there is a new interface and they are celebrating by allowing more question types: You can now hold a discussion forum, run a poll, fill in the blank, check all, embed a webpage, in addition to the classic multiple choice, free response, and reflective pause. 


In PlayPosit, when you add questions/prompts to videos, they are called bulbs. PlayPosit recently updated its interface, and allows new question types, as seen above. It is easy to use too.

To use
  • Head to Playposit.com
  • Signup or Login with your google account
  • Click Design Video Bulb


Search for a video or copy/paste the URL of the webpage with the video. Most video sites work well.
Once you are in the bulb edit mode, scroll over to the upper right hand corner. A box will magically appear asking if you would like to see the NEW PLAYPOSIT DESIGN. You want to do this, it offers many more options.

After you have chosen the video, use the waffle in the lower center to add questions. The video will abruptly stop anywhere you add a question.


Click the gear, then finish after your questions and prompts are written. Remember, there are a ton of question types to use, only if you activate the new view in the upper right hand corner. 


EdPuzzle


In EdPuzzle, you are limited in question types, but many find it easier to use, especially when it comes to connecting to google classroom.

  • Click My Content Click +Create
  • Copy/paste your URL

  • Use the scissors to trim the video
  • Use the microphone to record audio over the video (as it is playing)
  • Use the speaker to record audio notes (will stop the video)
  • Use the question mark to add questions (multiple choice, free response or reflection)
  • By clicking on the question mark, a question editor pops up on the left and you can input questions.


  •       Click finish to assign the video to the class or to copy the link for projection.


If you would like support or would like to plan a lesson, please utilize your friendly neighborhood LTT Support Teacher. 


Thursday, May 12, 2016

Three great tools for writing with students

1:22 PM 0
Three great tools for writing with students

Adobe Slate

1. Adobe slate - Web and App. Beautiful app and website that allows you to combine a combination of text, images, video and links to create a one page scrolling website. Jen Roberts at Nowthwood used Adobe slate for informational text writing with her sixth graders. Once students publish their Slates they get a public URL to share or link to. Students will need to create an Adobe ID, passwords require eight characters and our case sensitive. We recommend First initial(capital) last initial and 6 digits ex: Jg000000

Check out some amazing student examples

https://slate.adobe.com/cp/x456E/
https://slate.adobe.com/cp/7NHTX/
https://slate.adobe.com/cp/ZrLwe/
https://slate.adobe.com/cp/B99zr/

Creating an Adobe Slate


2. Storybird

Storybird - Web only but is Mobile friendly. Create beautiful chapter books, picture books and poetry with your students. Sign up as a teacher and invite students to join your class. Students will be able to read each other's stories. You can even invite parents to join with a view link and password. Use Storybird's art collection to inspire you writing.

Steps for Creating a Story with Storybird


Video Guides

Creating a story:
Storybird guide on how to create a story
https://storybird.com/blog/2015/11/how-create-picture-book/


Setting up a class:
Storybird guide on how to set up a class: https://storybird.com/blog/2015/10/how-create-class-storybird/


3. Story Creator

Story Creator- Free App. Allows you to draw or upload local images for your story. You can add text as well as voice recording on each page. When you are done you can share or publish your story.


Friday, January 22, 2016

Book Trailers with PowToon

10:42 AM 0
Book Trailers with PowToon

Readers and writers workshop is getting mashed up at Northwood with the awesome web tool PowToon.

Fourth graders in Mrs. Cavallaro's and Mrs. Pignagrande's classes are so excited to share their book trailers that they made with PowToon! Students used the tool's capabilities to add characters, images, text, and even their own voice to share why you should read their book next!

Mrs. Cavallaro has created an amazing classroom blog this year with Blogger and has posted her students trailers there. Check them out! http://cavclassact.blogspot.com/

Mrs. Pignagrande's class presented their trailers yesterday. Check out some of our favorites:
Brianna Delisanti
Brady Gerig
Zamirah Diaz
Ryan Wahl

PowToon is a great tool that you could use for so many projects! Get started using PowToon today!

Tuesday, January 5, 2016

Sixth Grade Toy Project Wraps Up With A Bang!

3:01 PM 0
Sixth Grade Toy Project Wraps Up With A Bang!

Students at Northwood geared up all December to pitch their toy to be inducted into the Strong Museum National Toy Hall of Fame. Each group presented on why their toy meets all the criteria to be the 60th toy inducted.

This year, in addition to a toy display board and presentation, students used the apps Adobe Voice and Adobe Slate to support their claim for their toy. The presentations were superb! Here are just a few of the presentations that really display the creativity and ingenuity behind the project. Think about all the ways you could use these awesome tools!


Paper


Clue


Scooter


Chalk


Check out Chalk's Adobe Slate: Chalk Adobe Slate


Nerf


Check out Nerf's Adobe Slate:Nerf Adobe Slate

Jenga


Check out Jenga's Adobe Slate:Jenga Adobe Slate


Operation


Check out Operation's Adobe Slate:Operation Adobe Slate


Friday, May 15, 2015

Creating Interactive Timelines

12:46 PM 0
<h2>Creating Interactive Timelines </h2>

Interactive timelines are such a versatile tool for your classroom. Whether you have 1:1 iPads or are visiting the computer lab there is a way to use interactive timelines with your students.

Here are some ways to use interactive timelines in the classroom
  • Timeline of an event or topic. Jess Thompson's students are just wrapping up their Revolutionary War timelines that highlight key people and events in the American Revolution
  • Process Journals. Use a timeline to reflect on your unit, project, or school year. Have students enter reflections daily or weekly and see the growth of the reflections over time
  • Timeline of a unit, skill, or project. Have students chart their catalog their learning or understanding of a concept or project and see how they have grown over time
  • Chart the journey of a character through a book or novel
  • Biography

With the right tool creating timelines with students is super easy... and engaging!

Our favorite story telling tools come from Knightlabs. They offer two really cool tools for making digital timelines. The first is their Timeline JS tool. It is super easy to use and the backbone of the timeline is a Google spreadsheet. You can share a template with students and have them make a copy of the spreadsheet to catalog their "events" or if you are using Google Classroom even better! Just post the template into classroom to make a copy for each student and you are off running.

Here is an example timeline that displays some of the great possibilities that you can put into the timeline.


Make One!

1. Click here to make a new spreadsheet for your timeline: Timeline Template
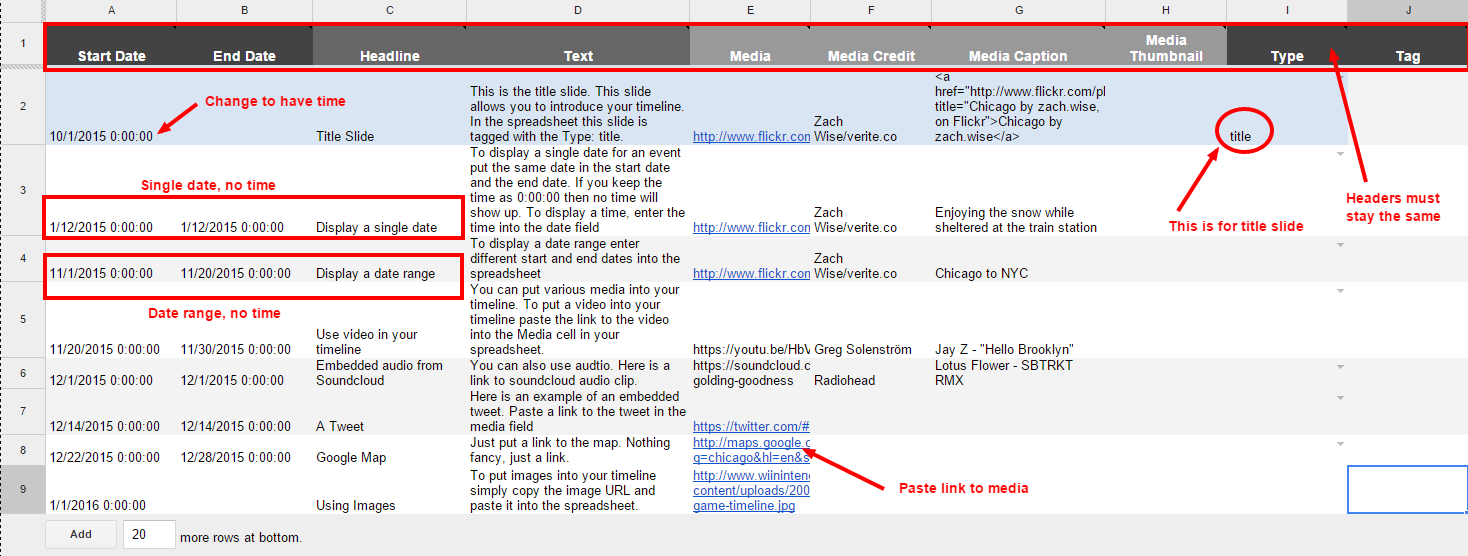
**Do not change column headers. Do not remove any columns. Make sure there are no blank rows in between data. You can add additional rows at the bottom of the sheet.

2.Fill out the spreadsheet for your timeline. I put descriptions of what goes in each cell in the timeline template to give you guidance. The image below also highlights key areas. One of the great features is that the dates do not have to be entered in chronological order, the script will reorder your dates accordingly!


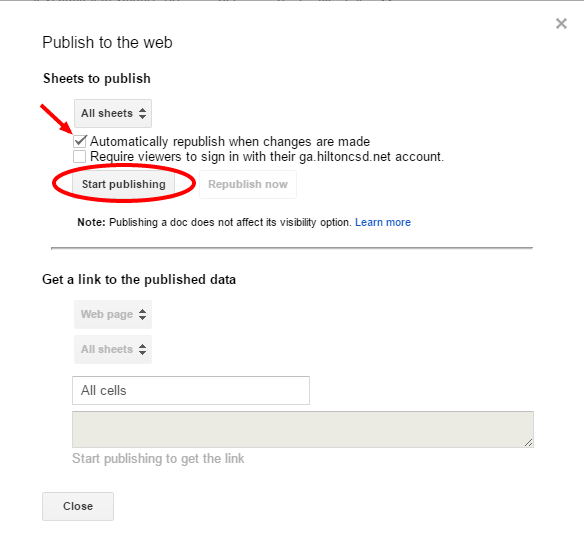
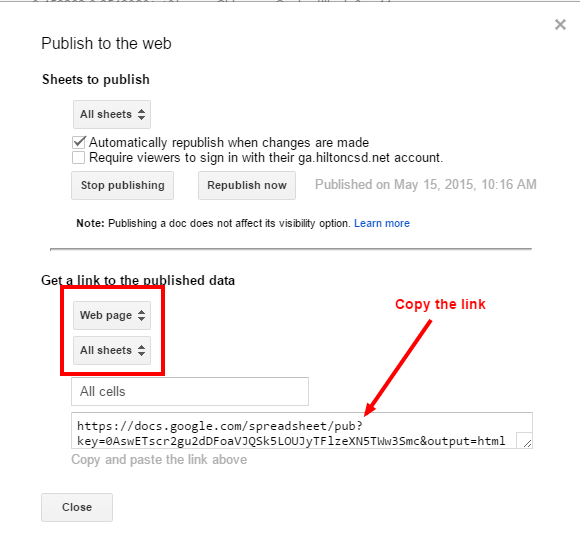
3. When you are all done and want your timeline to be live. Publish your spreadsheet to the web. Go to File > Publish to the web.


Copy the URL

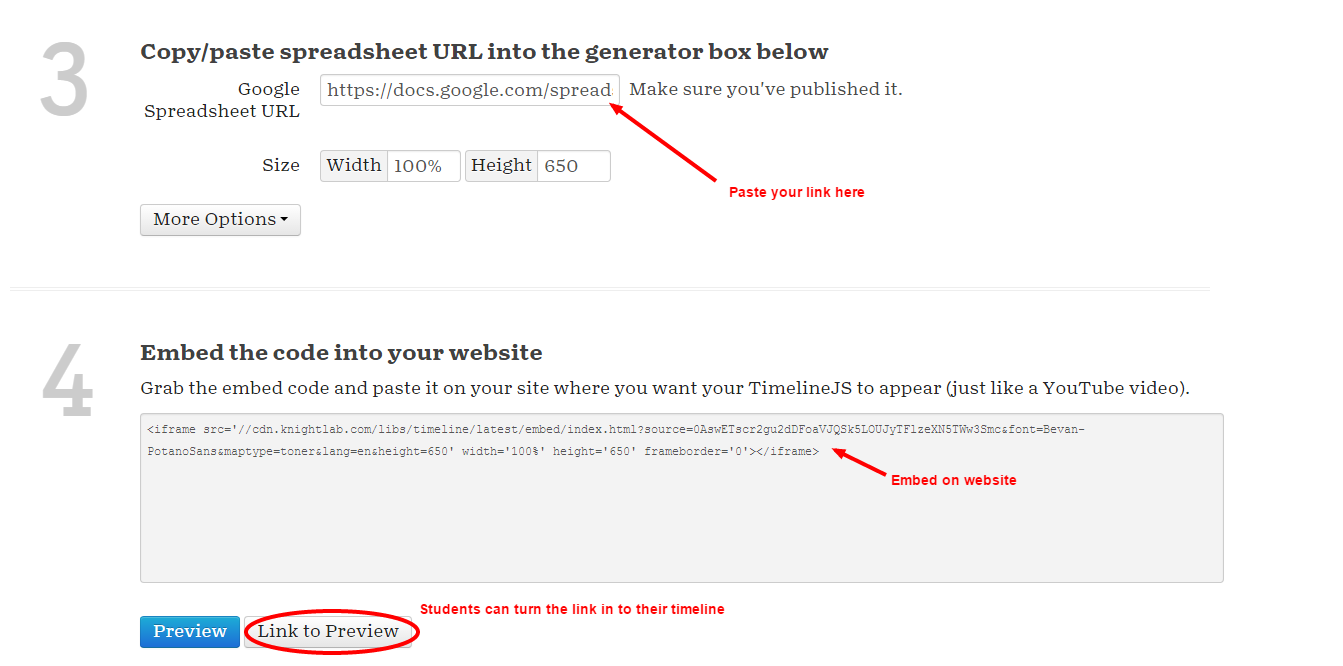
4. Go to this site: http://timeline.knightlab.com/#make
Scroll down to #3. Paste in your URL. Get your link or embed your video


Video tutorial on Timeline JS


Another great timeline tool is Hstry. These timelines move vertically down the page and allow you to use media as well. One of the key differences is that you have to make an account for this one.

Knightlabs also provides a StoryMap. The StoryMap is a bit more complicated. It involves making extra large images and navigating around them. But, it's a great tool. Stay tuned for a how to on how to make a StoryMap

Check out this character map using StoryMap

Friday, May 1, 2015

Digital Narratives with Explain Everything

3:04 PM 0
Digital Narratives with Explain Everything
Jess Thompson's students are writing narratives. They used iPad minis and the Explain Everything app to record themselves telling their narrative.

Students took pictures of their scenes and characters with the iPad and uploaded those images into Explain Everything. Once in explain everything, they could crop and cut the images to fit their scene. Explain Everything uses a slide like layout where you can add images, text, drawing, video, and audio to each slide. The app, unlike many others, allows you to layer these components and record audio and movement on each slide. When students are done, they can export their movie right to Google Drive and share right from the cloud!

Check out Alex and Aidan's Digital Narratives
Alex's

Aidan's

Tuesday, April 14, 2015

Using Pixie for Digital Storytelling

10:10 AM 0
Using Pixie for Digital Storytelling
= Students in Barb Richardson's kindergarten students have been working on a travel journal for their travel unit. They used Pixie to tell a story about where they are going to travel and what they are going to pack. We created a Pixie template with predefined pages and images. Students told their story, packed their suitcase and even drew a map in Neighborhood Map Machine that they uploaded to their journal. Pixie even allows students to record their voice over their slides as well! Barb is then able to see what students have done and post a link to the shared digital travel journals. How Great!

Check out Kylie's almost finished Travel Journal