Cadet Tech : New(ish) Tech
Showing posts with label New(ish) Tech. Show all posts

Tuesday, September 27, 2022

😿Sad about losing Quizlet? Knowt More!

12:30 PM 0
😿Sad about losing Quizlet? Knowt More!
Another year without quizlet are sad times no more... Launched this September is a tool called Knowt. A free flashcard tool with Quizlet set importing, class options, and self study mode. 

Sign up at https://knowt.io/

I used the Sign in with Google SSO button (You, and your students should too) 

From your home you can Explore Notes, Flashcards and Textbooks created by other users (mostly students)


From the plus sign on your home page or a right click you can create: 
- Folders
- Notes
- Upload files from Drive or your Computer to create notes
- Create Flashcards


You can also create classes and assignments. This feature seemed to be a little quirky to me and is just out of beta so it can be glitchy. I was unsuccessful with the connect Google Classroom option under classes, but maybe you will be. You can invite students using a code. 


You can create or find notes inside Knowt on topics to create assignments for students. Here I use the explore tool to find a set from an APUSH chapter. This process is the same as creating your own notes and words for students. Here I will duplicate to a class.


If you duplicated a note to the class you want to make sure you go in and share out that notebook


If you want to be able to edit content that you find from the explore you will want to "Duplicate to Notebook". This will create your own copy that you can edit. 


You can also create and import flashcards from Quizlet. Creating and importing terms and definition is super sleek. 


Student View of assignments. Once students join your class you can create assignments in Knowt. Here my test student opens the Chapter 1 Homework I assigned above. 


Lastly, the study set options are really nice. There are new study types and quiz options coming mid month! 

Friday, September 16, 2022

📰 Classroom Newsletters and Announcements with Gmail Layouts

2:00 PM 0
📰 Classroom Newsletters and Announcements with Gmail Layouts


Introducing Gmail Layouts! 

When you compose a new email in Gmail you now have the ability to apply predesigned layouts and set default styles such as colors, fonts and images. 

Access the layouts

Click Compose
Select Layouts from the ribbon at the bottom of your draft email


Set Default Styles

Select colors, fonts and images that are saved to your layout for the next time you want to use a layout

Customizing a Template

Once you have selected a template swapping out the text, images and links is a breeze! 

Wednesday, May 30, 2018

Some Juicy Pear Deck Updates Increase Ease, Accessibility, and Reflection Possibilities

11:06 AM 0
Some Juicy Pear Deck Updates Increase Ease, Accessibility, and Reflection Possibilities
You might remember trying Pear Deck once or twice and then going on about your life. Pear Deck has since totally been redesigned and their approach has completely changed! Basically, it is a lot more accessible and all the things you hated about it are gone...which means you might actually want to use it now.

The News:
1. Pear Deck is now exclusively a Google Slides Extension.
2. There are no more limits or subscriptions or workarounds to worry about that will make it more difficult to use, all the free features are very sustainable. You can just plan and rock it!
3. There are some pretty fun templates that might streamline your student feedback and formative assessment.

How do I use it now:
1. If you do not have it yet, go to Google Slides, click Add-ons, Click Get Add-ons and add Pear Deck.
2. Make a Google Slides Presentation or open one that you have already made.
3. To any slide to which you'd like students to respond, open the Pear Deck add-on (in Add-ons).


From here you can choose how you want students to respond, whether it be in text, multiple choice, numbers, or a few other options. Draggable and drawing slides only last your first 30 days.

If you have any Slides or PowerPoint presentations hanging around, why not throw in some checks for understanding? Student responses (which they've given on their Chromebook) can then be projected for the class with the click of a button.

I also like the templates, especially the T-chart template. Anytime you are doing a T-chart, students can type or draw right in it and it can be instantly projected.


If you are presenting, just click present and share the code with your students.

Wednesday, May 3, 2017

Check123 - A Video Encyclopedia

10:09 AM 0
Check123 - A Video Encyclopedia

There are amazing great educational videos on YouTube and other locations on the Internet. The difficulty is wading through to find quality videos you can use in your classroom.

Check123 curates and rates videos using topic "experts" (according to their site). All the videos are 1, 2 or 3 minutes long. Students can quickly find videos related to their interests which allows them to explore further videos on the same topic to expand their knowledge base. 

As a side note, once you find a great video, check out the channel or website and you may find others in your area of interest. Here's a science one I found from ASAP Science and one with a variety of topics at ouLearn on YouTube. Consider using these videos with a flipped video tool such as EdPuzzle or PlayPosit.

Here is an intro video from Check123


Wednesday, April 26, 2017

Communication, Reflection and All Kinds of Assessment with ReCap

9:11 AM 0
Communication, Reflection and All Kinds of Assessment with ReCap
Quick Videos with ReCap.

Recap allows students to record video responses or create quick videos up to two minutes, and as short as fifteen seconds. This tool is ideal for using videos in non-project or mini-project assignments. Maybe you don't want students to dedicate too much time to editing or making videos more professional, but maybe you just want a quick raw video alternative. Recap is your solution.

ReCap is software by Swivl. We also have a number of Swivls that work with devices for recording if you want to kick it up an additional notch.

I will lead off with a few ideas (though I can't wait to hear yours)...


Ideas, Ideas, Ideas
  • Speaking conversations in LOTE
  • Opinion sharing
  • Book reviews
  • Quick skits recorded (history or English)
    • (As a history teacher, we used ReCap for students showing the changing of borders on video and to create propaganda commercials).
  • Phys Ed tutorials on mechanics/form
  • Explaining, showing, or tutoring in literally anything
  • Free feedback on books/stories/readings
  • Showing art techniques
  • Music performances
  • Read alouds and alongs

I Want In!


1. Logon to the ReCap website, Chrome App, or iOs App 
2. Sign in as a teacher using your GA account (this will allow for easy Google Classroom integration)


3. Add a class (or classes, or individual sets)


4. Click "Add Recap"

Here you have the chance to add your questions. Type a topic title for your question(s) and type your questions or instructions in the box below.


ReCap will let you add up to ten questions in an assignment. You can also record instructions or an example by clicking record video. This technique might allow for a more conversational assignment or if you would like to give added instructions (or if you are a better speaker than typist)


6. Click next to set up the assignment. Here you can roll out your questions or instructions to the whole class, or just specific students. You can also adjust the maximum recording time (15s, 30s, 60s, or two minutes), and you can set a due date. You can also set up a feedback system if you'd like to acknowledge that you watched the videos.


Getting Students Signed Up Is Super Easy 

When students go to the website, they sign up as a student using the automatic signup with their google accounts. 

Regardless of what type of registration you have selected, there will be a join pin. Soon as students are given the join pin, they are in the class and ready to learn!


Grading

Grading is particularly easy, you can provide three levels of feedback on the site itself, but it is easy to watch the videos and grade them according to your own rubric. The assignment will come with a teacher panel that allows you to watch all the videos without clicking in and out of pages.


Just a quick link to a great article on ReCap if you are interested, from iPad Educators

The fine people from the FMS Tech Squad also put this video together regarding ReCap.

UPDATE: ReCap just unleashed a Beta 2.0 Version. The update includes the option to create "Journeys". Journeys multiple step ReCap videos that allows you to create videos, or pull videos from YouTube, Discovery, and several other sites.


In order to create a journey, click "Create Journey" next to the Add recap button and follow the steps. This allows you to record instructions or stick with typed prompts, and to add a few pages to the journey. Still super easy, now three times as powerful. You could do entire lessons through a Journey.


Please please please let your friendly local Instructional Tech Teacher know if you need any assistance with this tool, or if you would like to set up a co-teaching opportunity.

Tuesday, April 19, 2016

ReadWorks.org

2:03 PM 0
ReadWorks.org


ReadWorks offers over 2,500 FREE leveled reading passages for K-12; you will need to create an account. You can select the following criteria:
  • Lexile range
  • Grade level
  • Topics 
  • Text types: literary, informational, poetry
  • 19 skills and strategies such as author's purpose, character, fact and opinion, voice...
Some passages have
  • Vocabulary lists with definitions
  • Paired texts
  • Questions that are text dependent
  • Step reads: the same text at two lexile levels
For an introductory video you can visit this page.

Elementary teachers - There are also lessons and units for all your favorite elementary books from The Grouchy Ladybug to The House on Mango Street. For more information on the texts available visit this site.

Thursday, March 24, 2016

Unfiltered News from Around the World

10:48 AM 0
Unfiltered News from Around the World


This is a new site (in Beta) which looks amazing for current event news from around the world. You will view a bubble map of the world with different current event topics relevant to that nation. Once you select a topic you can view articles on a selected topic from different parts of the world. This is a great way to get a global perspective on a topic. It's also interesting to see what is trending in different countries. 

The articles are automatically translated to English so the translations may have inaccurate wordings. 

Friday, March 11, 2016

Get a Perspective - Perspecs!

2:57 PM 0
Get a Perspective - Perspecs!
"Perspecs is a new free app that curates the top news stories from a variety of established regional, national and international news sources. Unlike traditional aggregators and news curation services, Perspecs goes a step further and offers readers 3 polarised opinions of the same story. 

How these opinions are categorised can vary. For political stories this could be in the form of 'left', 'background', 'right.' For review items the categories could be 'negative', 'neutral', 'positive'."  Quoted from their website (with English spellings). Perspecs was launched this week!

Currently this is an iPhone and Android app only though you can view the entire article on the web. Search for iPhone app, you won't find it if you search for iPad apps.

You will get current articles from the five previous weekdays. Today there are ten articles, each with three perspectives. Many of the articles are of British topical interest but some are universal. These articles are of secondary level interest. I tested two articles and their lexiles were 1170 and 1510. Some articles may be blocked for students on our network. 

A few of today's examples (March 11th): 
  • Winning war against ISIS?
  • Is Brazil ungovernable?
  • Trolls - attract or ignore?
  • ADHD over diagnosed?
  • Gimmick over purpose? (smart phones)
Anyone have a great app or website that offers similar content with multiple perspectives? 


Thursday, November 5, 2015

Using Infographics in the Classroom

12:40 PM 1
<h3>Using Infographics in the Classroom</h3>

Infographics are an amazing tool for presenting important information and facts in a visually appealing and approachable way.

Here are just a few ideas for using Infographics with students:
  • Explaining rules, processes, or concepts
  • Debating or comparing
  • Presenting an argument
  • Sharing data or showing trends
  • Timeline of events
  • Presenting research

One of the best tools out there for creating Infographics is Piktochart. Piktochart is free, has a library of free templates, is easy to use, and integrates with student Google Accounts. Below is a guide for using Piktochart.

Using Piktochart

1. Log in to Piktochart with your Hilton Google (GA) Account


2. Select the style of your project. You can choose betweeen: Infographic, Presentation, Poster or Report. Below each category there are awesome free templates to choose from and use.


Main Menu:
Rename your Infographic and Save:


3.Once your template is open you want to add or edit your blocks of content. Click on the block of content. You can add, move, clone and delete blocks of content.


Cloning and Deleting:


4. Once a block is selected you can add:

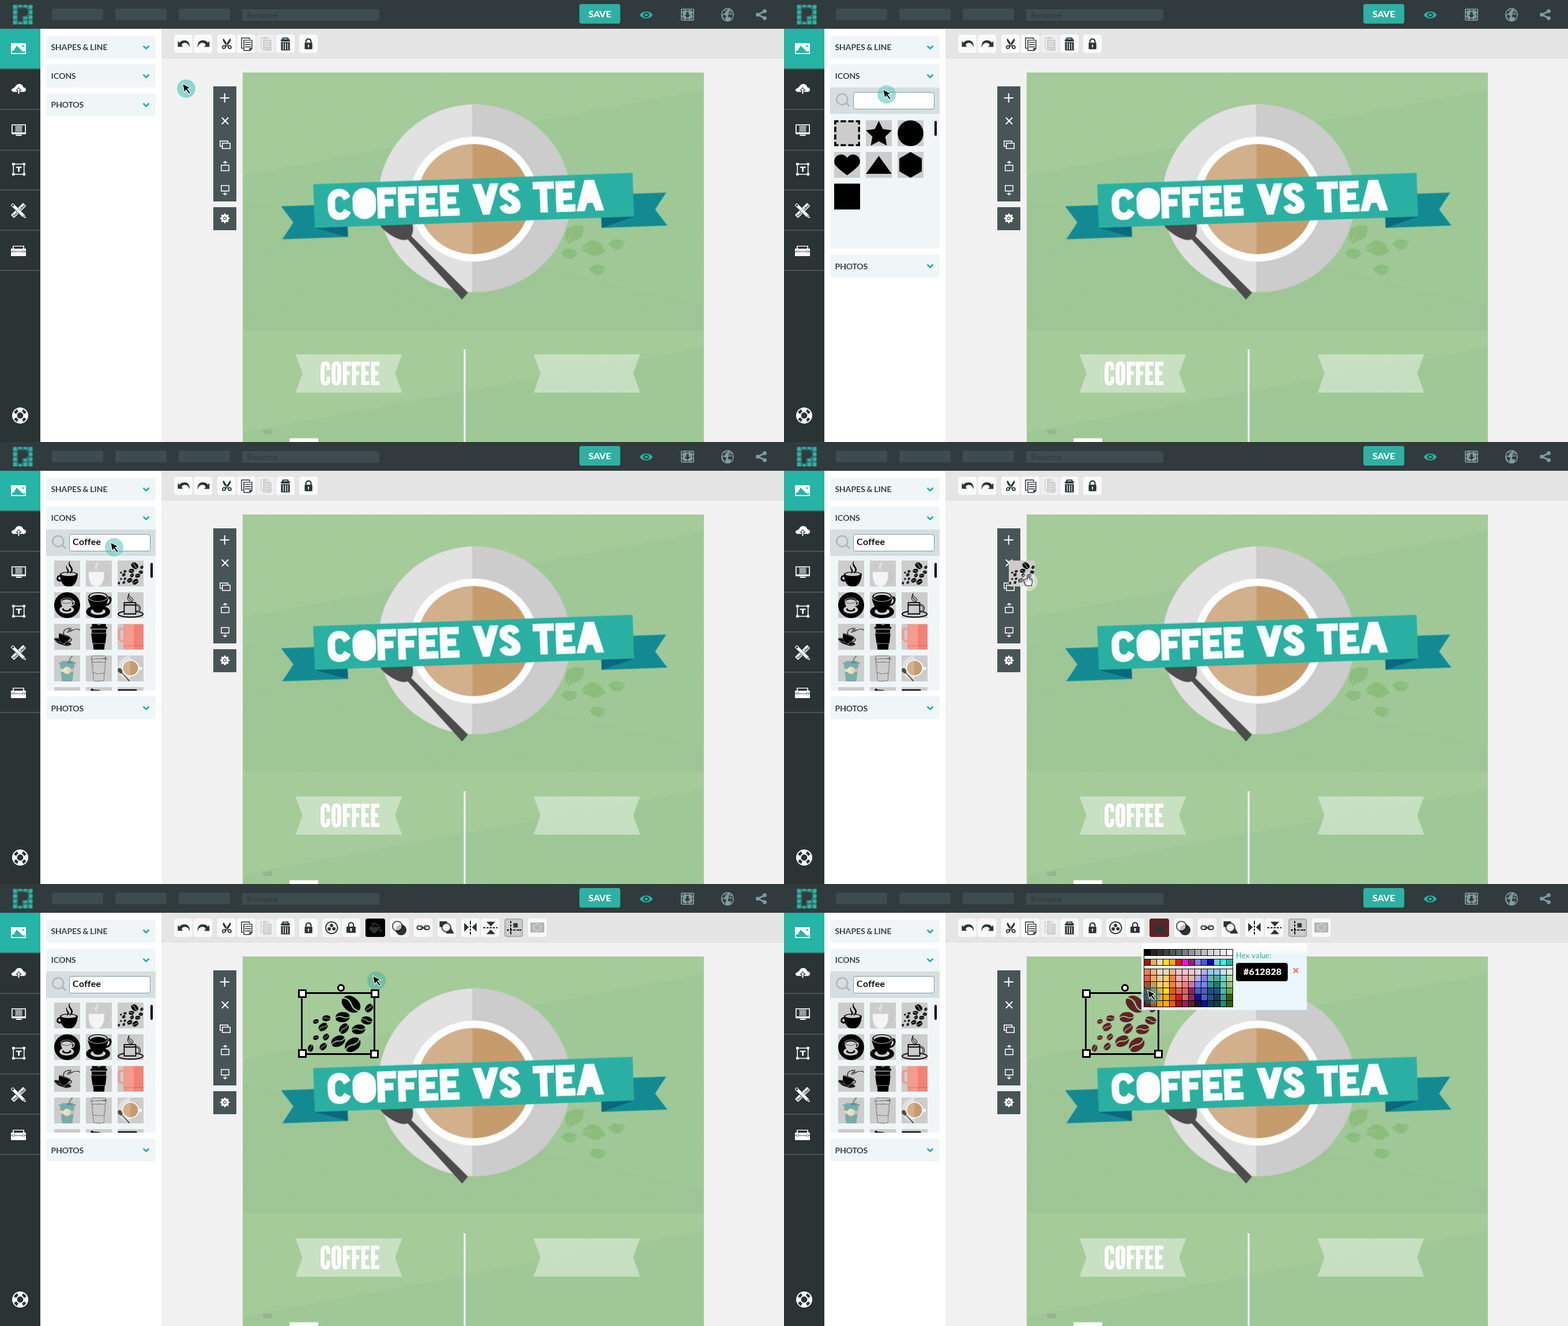
Graphics:


Shapes and lines:


Upload Images:


Change the Background:


Add/Edit Text:


Insert Charts and Data:


Save and Export:


Check out their individualized guides for more help! Help Guides


Friday, May 15, 2015

Creating Interactive Timelines

12:46 PM 0
<h2>Creating Interactive Timelines </h2>

Interactive timelines are such a versatile tool for your classroom. Whether you have 1:1 iPads or are visiting the computer lab there is a way to use interactive timelines with your students.

Here are some ways to use interactive timelines in the classroom
  • Timeline of an event or topic. Jess Thompson's students are just wrapping up their Revolutionary War timelines that highlight key people and events in the American Revolution
  • Process Journals. Use a timeline to reflect on your unit, project, or school year. Have students enter reflections daily or weekly and see the growth of the reflections over time
  • Timeline of a unit, skill, or project. Have students chart their catalog their learning or understanding of a concept or project and see how they have grown over time
  • Chart the journey of a character through a book or novel
  • Biography

With the right tool creating timelines with students is super easy... and engaging!

Our favorite story telling tools come from Knightlabs. They offer two really cool tools for making digital timelines. The first is their Timeline JS tool. It is super easy to use and the backbone of the timeline is a Google spreadsheet. You can share a template with students and have them make a copy of the spreadsheet to catalog their "events" or if you are using Google Classroom even better! Just post the template into classroom to make a copy for each student and you are off running.

Here is an example timeline that displays some of the great possibilities that you can put into the timeline.


Make One!

1. Click here to make a new spreadsheet for your timeline: Timeline Template
**Do not change column headers. Do not remove any columns. Make sure there are no blank rows in between data. You can add additional rows at the bottom of the sheet.

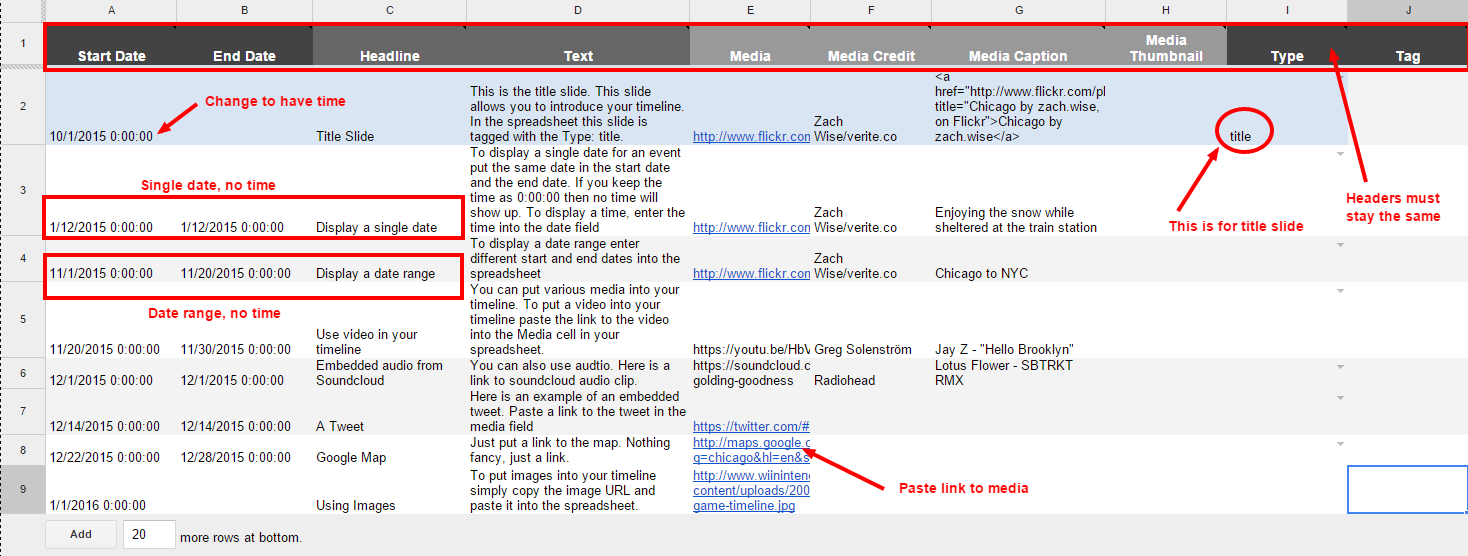
2.Fill out the spreadsheet for your timeline. I put descriptions of what goes in each cell in the timeline template to give you guidance. The image below also highlights key areas. One of the great features is that the dates do not have to be entered in chronological order, the script will reorder your dates accordingly!


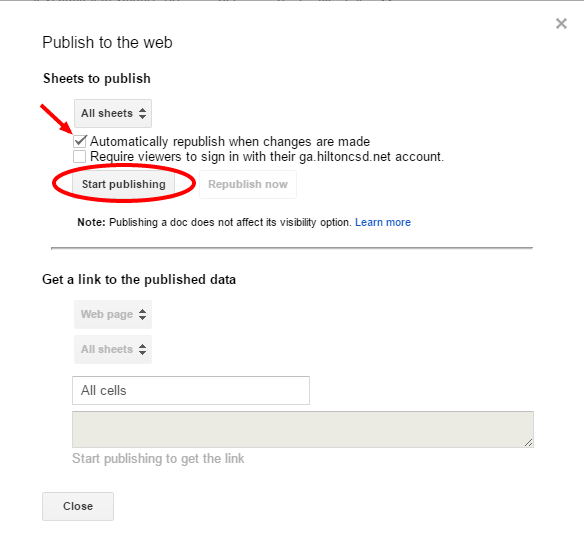
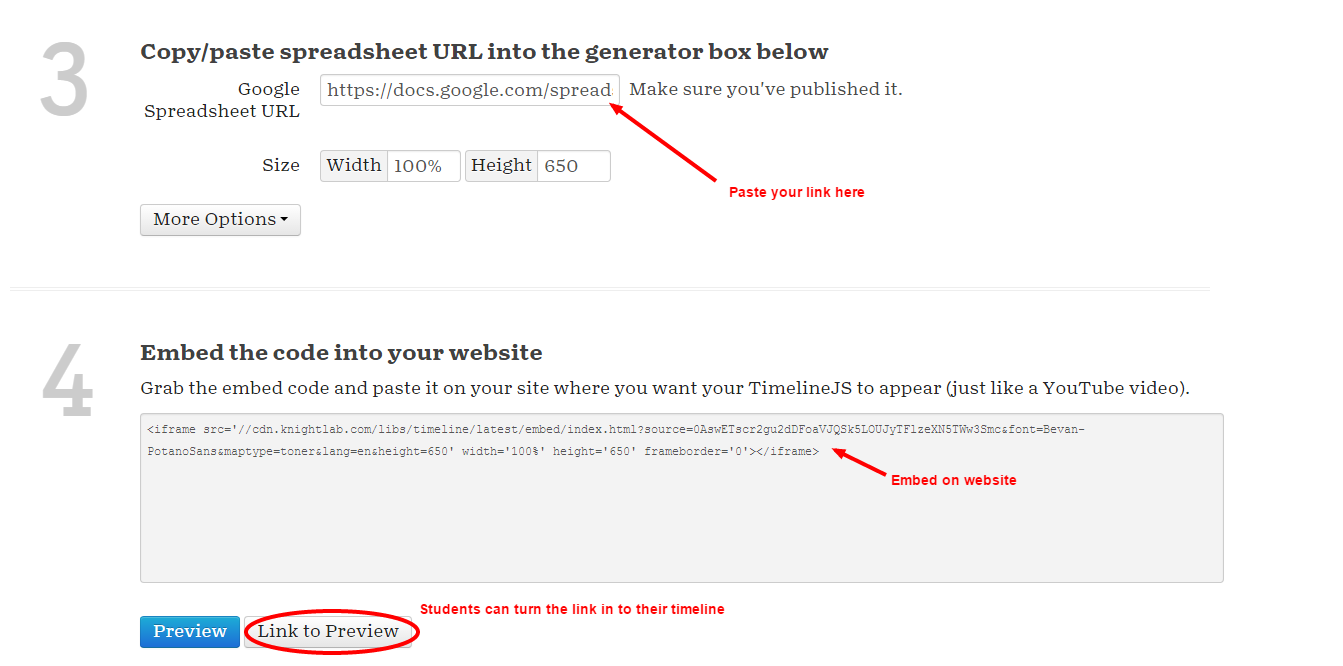
3. When you are all done and want your timeline to be live. Publish your spreadsheet to the web. Go to File > Publish to the web.


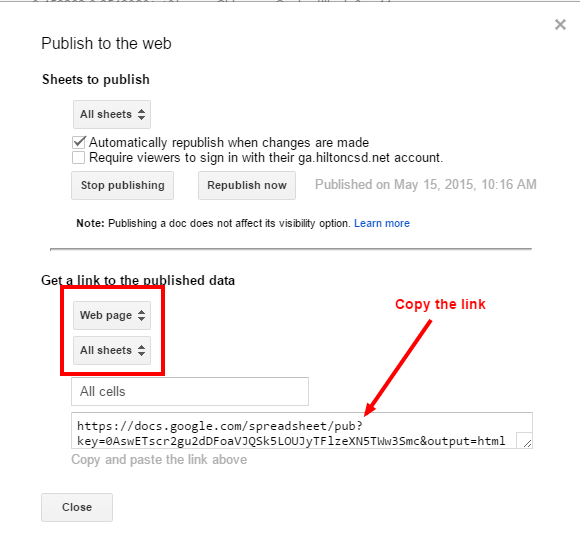
Copy the URL

4. Go to this site: http://timeline.knightlab.com/#make
Scroll down to #3. Paste in your URL. Get your link or embed your video


Video tutorial on Timeline JS


Another great timeline tool is Hstry. These timelines move vertically down the page and allow you to use media as well. One of the key differences is that you have to make an account for this one.

Knightlabs also provides a StoryMap. The StoryMap is a bit more complicated. It involves making extra large images and navigating around them. But, it's a great tool. Stay tuned for a how to on how to make a StoryMap

Check out this character map using StoryMap

Friday, May 1, 2015

Digital Narratives with Explain Everything

3:04 PM 0
Digital Narratives with Explain Everything
Jess Thompson's students are writing narratives. They used iPad minis and the Explain Everything app to record themselves telling their narrative.

Students took pictures of their scenes and characters with the iPad and uploaded those images into Explain Everything. Once in explain everything, they could crop and cut the images to fit their scene. Explain Everything uses a slide like layout where you can add images, text, drawing, video, and audio to each slide. The app, unlike many others, allows you to layer these components and record audio and movement on each slide. When students are done, they can export their movie right to Google Drive and share right from the cloud!

Check out Alex and Aidan's Digital Narratives
Alex's

Aidan's

Google Drive Overview

12:38 PM 0
<h2>Google Drive Overview</h2>

Sharing truly is caring... and google drive is the tool for showing that you care. Create, upload and manage documents and folders. Share with the click of a button and customize sharing permissions. This overview of Google Drive will get you up and running in no time!
We are going to break up your Google Drive into three sections; left, middle and right. On the left hand side of your Google Drive you can create new Google files or upload folders and files by clicking on "New". In addition to this, you can navigate between files in "My Drive" and files that others have "Shared with me".

In the middle of your Google Drive you can navigate between your files and folders. You can view the middle in a grid view pictured here or a list view. Click on the three horizontal lines in your file tools on the left to toggle between the two views.

On the right you have your file tools. If you select a file in your drive you will see additional file tools on the right as seen here. Click on the "i" to get file details and activity in the pane on the right. It list general file information, who you have shared it with, last activity and much more! With a file selected you also get the share icon in the file tools to easily share the file with others from this view.
With Google Apps for Education you can create Google Doc, Sheets, Slides, Forms, and Drawings right in your Google Drive. Share you file with collaborators and work on the same file at the same time remotely. From Google Drive you can also upload documents and folders from your computer.
You can share a file a variety of different ways. You can share by right clicking on a file and selecting "Share". With a file selected you can also click on the Share icon from the File Tools on the right. You can also share a file when you are actively working a file by click "Share" in the upper right or by going to File > Share. Google Drive also allows you to share a link to a file. You can get the link by right clicking on the file and selecting "Get Link" or from the Link icon in the file tools. You can also set the permissions of what the link does from the share menu. It is a great tool for you to share out examples of student work or provide students with resources from your Google Drive.
>From the sharing menu start typing in the last name of the person you would like to share the file with. As you type a list of possible suggestions will appear. Select the individual you want to share with. You can also set whether that person has Edit, View, or Comment rights to the file. You are also able to get the shareable link here as well. The advanced sharing menu allows you to change or customize your sharing permissions at any point.
When files have been shared with you they are listed in the Shared with Me folder in your drive. You will see a running list of all files that have been shared with you, who shared it, the date shared, and if you have moved it to a different location. Select any file in Shared with Me and move it to your drive by right clicking and selecting Add to My Drive or selecting Add to My Drive from the file tools. When a file is shared with you, you are not the owner of the file. To make a copy of a file right click the file and choose Make a Copy.
Google Drive functions very similarly on the iPad. On the left you have links to My drive and Shared with me, and in the middle you files. Click on the "hotdogs" on the left to navigate around your drive.
Click on the "i" of a folder or document to view the document details. Here you can share, move, rename, etc. It also provides you with options to keep the file locally on the device for offline editing.
From Shared with me on the iPad click on the "i" to view document details, move and manage the file.

Sunday, April 26, 2015

Gett'n Googley with Google Drive

7:09 PM 0
Gett'n Googley with Google Drive
Google Drive is an amazing resource for you, your students and your classroom. It allows you to create, upload, share and collaborate in the cloud with your colleagues and students. Google Drive sharing eliminates the need to email documents back and forth, with the click of a button you can share and collaborate in the cloud.

Julie Dioguardi is using Google Drive in tandem with Google Classroom to organize, share, collaborate, grade, and provide feedback for students on their Power of One Project. She can also use these great tools to invite and share with other teachers! She is now a Googling Hero and you can be too! Link to the handout